MiMiCPy Handbook
This is the “handbook” to the MiMiCPy package, functioning as an introduction and quick reference manual. MiMiCPy allows for quick input preparation of MiMiC input scripts, and it is used throughout the rest of the MiMiC tutorial.
Main feature described here:
Main features of MiMiCPy PrepQM subcommand
Boundary atoms selection in MiMiCPy
VMD/PyMOL support for PrepQM subcommand
Main features of FixTop subcommand
Main features of CPMDid subcommand
Brief explanation of CPMD2Coords and Geom2Coords
Accessing MiMiCPy as a Python library
![]() This tutorial assumes the user to have running versions of MiMiC, CPMD and GROMACS.
This tutorial assumes the user to have running versions of MiMiC, CPMD and GROMACS.
Instructions to install the MiMiC Framework (the MiMiC library and the MiMiC communication library) can be found in the Installation/MiMiC Framework section.
Instructions to install CPMD and GROMACS with MiMiC enabled can be found in the Installation/External Programs section.
Instructions to install MiMiCPy can be found in the Installation/MiMiCPy section.
![]() Each section of this tutorial is dedicated to a different subcommand and is in principle independent from the others. Based on your needs, after the Example system: Acetone in Water section you can start from any of the following ones.
Each section of this tutorial is dedicated to a different subcommand and is in principle independent from the others. Based on your needs, after the Example system: Acetone in Water section you can start from any of the following ones.
![]() Main contributors to this handbook:
Main contributors to this handbook:
Andrea Levy

Bharath Raghavan
Sophia Johnson
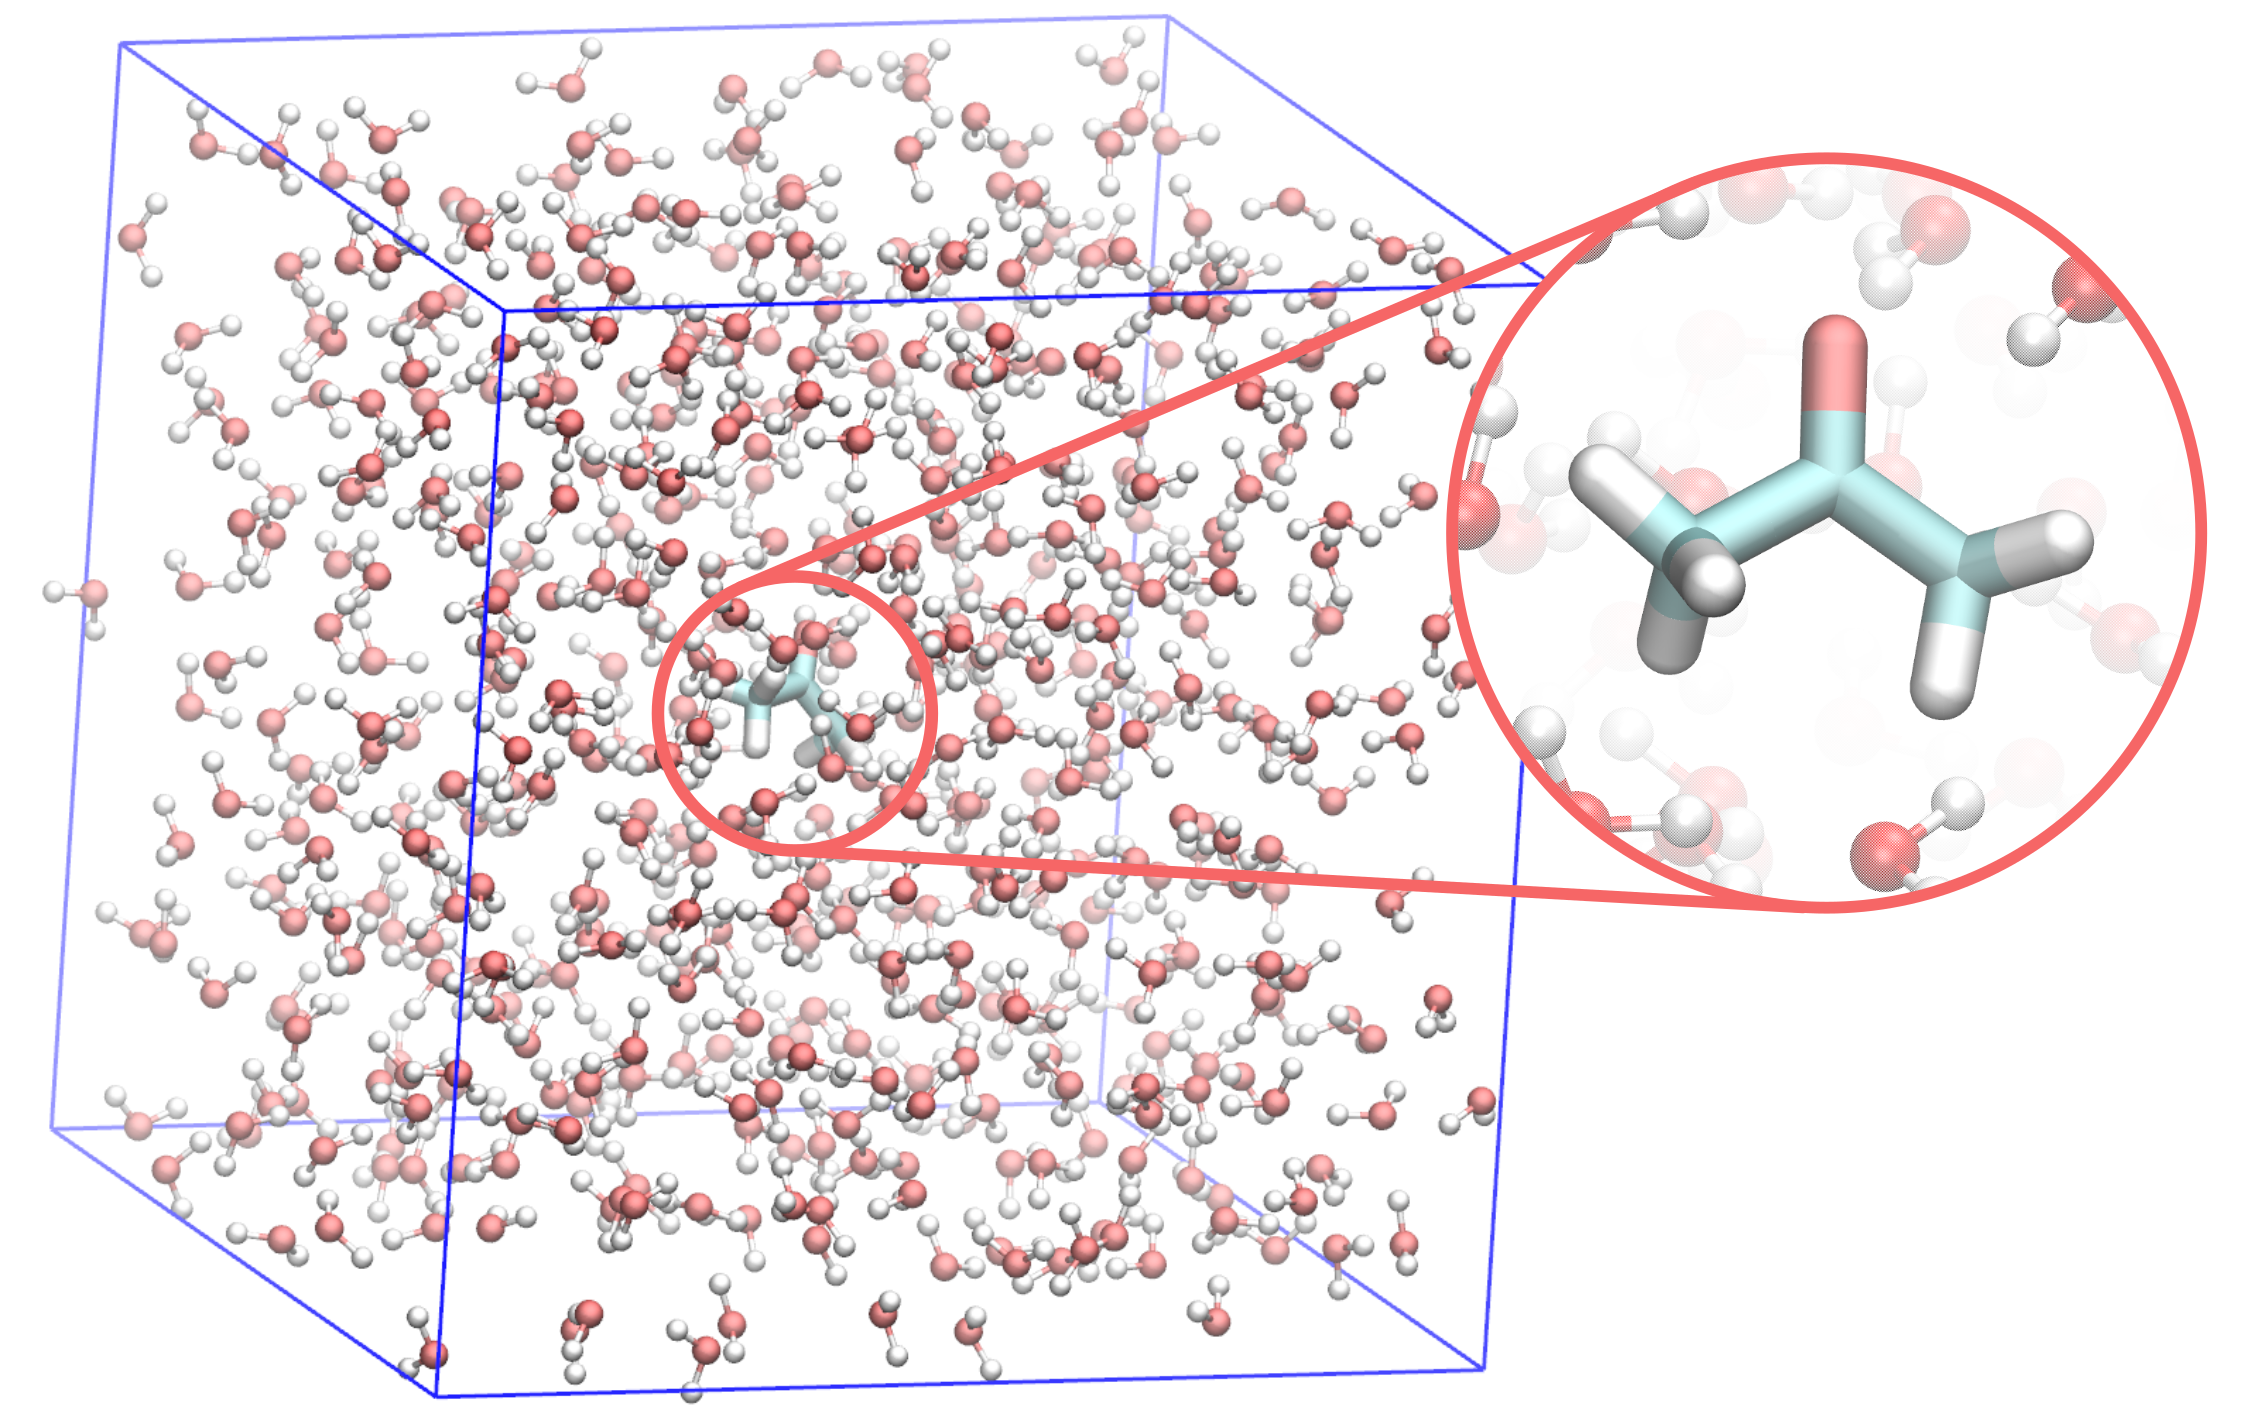
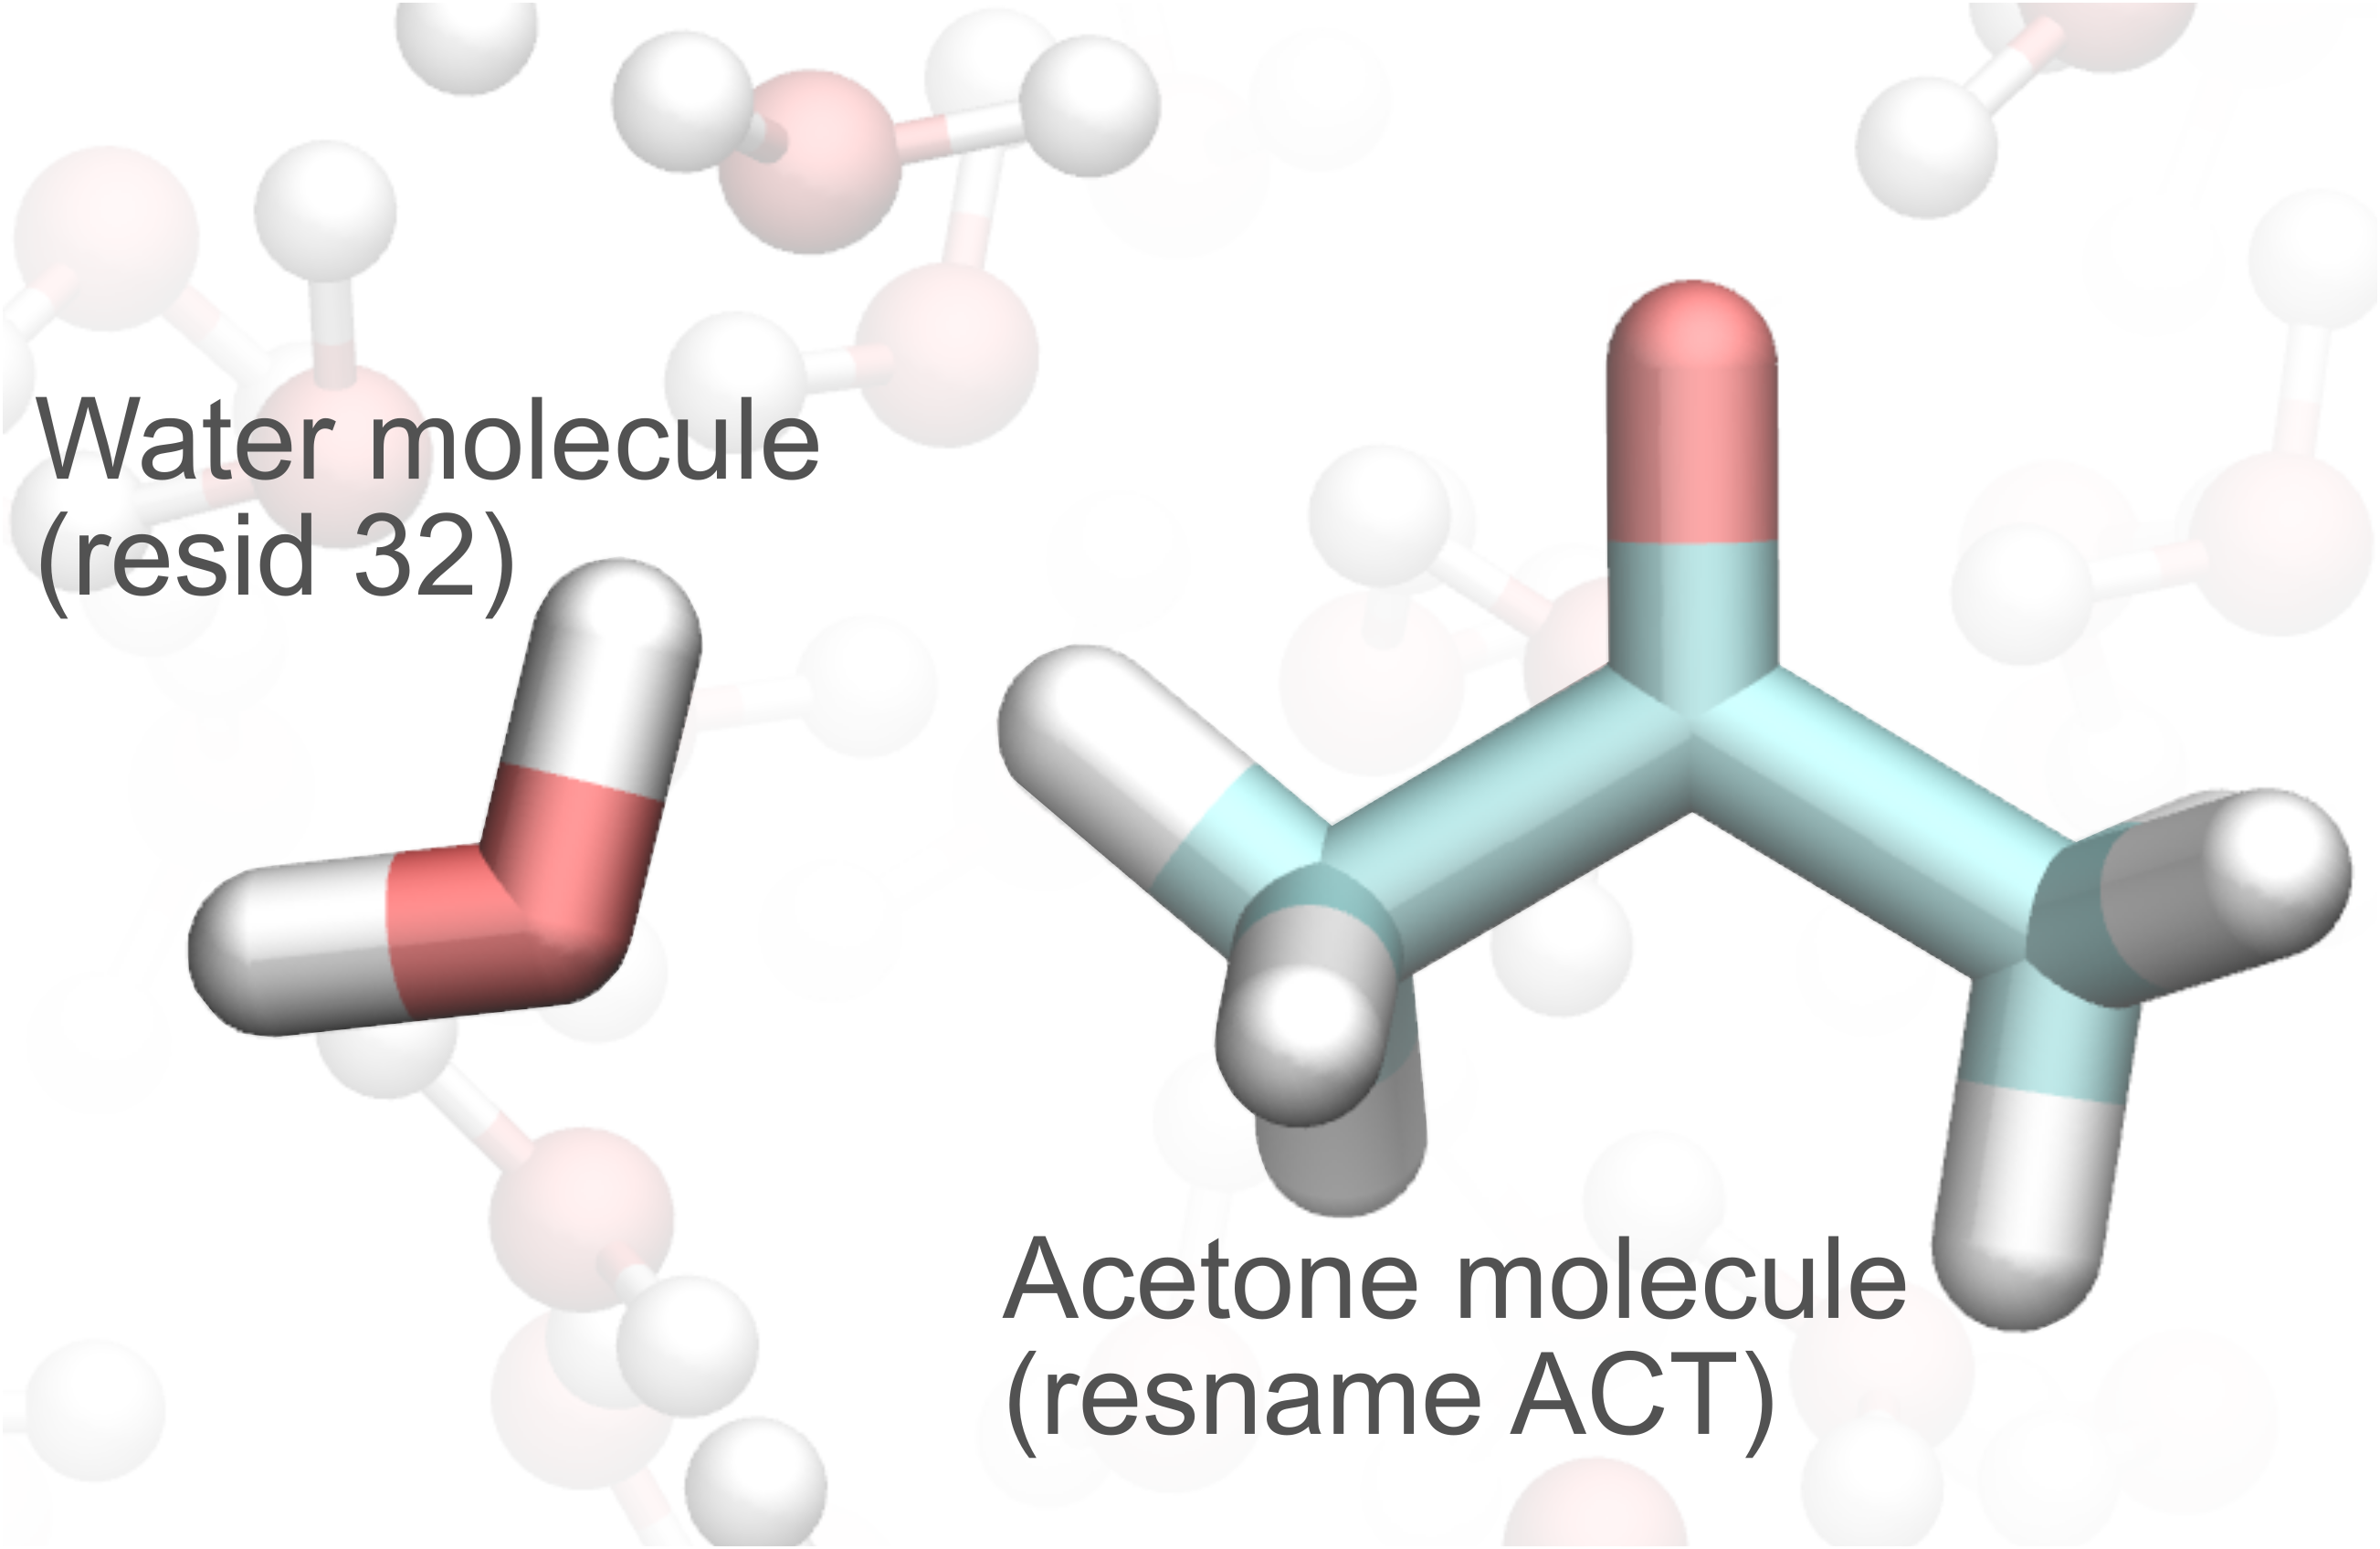
Example System: Acetone in Water
For this tutorial we will assume that you downloaded the corresponding git repository, hence you will have the provided folders and files in the same locations.
curl https://gitlab.com/mimic-project/mimic-docs/-/archive/main/mimic-docs-main.tar.gz?path=docs/tutorials/MiMiCPyTutorial -o MiMiCPyTutorial.tar.gz
tar --strip-components=3 -zxvf MiMiCPyTutorial.tar.gz
The above commands downloaded a copy of the exercise repository MiMiCPy in the current folder. Navigate the repository and create your own directory to run this exercise
cd MiMiCPyTutorial
mkdir solution
cd solution
The structure and topology files for acetone are provided in the data folder. Copy this file to the current folder:
cp ../data/acetone_equilibrated.gro .
cp ../data/acetone_equilibrated.top .
cp ../data/acetone.itp .
PrepQM
As the name suggests, prepqm is the main tool to prepare MiMiC QM/MM input files. In short, it accepts MM topology and coordinate files, and after inputting the QM selection, outputs the CPMD input file and GROMACS index file necessary to create the .tpr run file.
Create a folder in the MiMiCPyTutorial/solution directory where you will test the PrepQM command with different keywords:
mkdir prepqm
cd prepqm
Minimal input
The minimal input for PrepQM consists of the MM topology (.top file) and the coordinates (.gro or .pdb files). Run the MiMiCPy prepqm script using the files provided:
mimicpy prepqm -top ../acetone_equilibrated.top -coords ../acetone_equilibrated.gro
![]() When running MiMiCPy PrepQM command, make sure GROMACS has been sourced, i.e. is available on the command line. In particular, you may need to set the environment variable
When running MiMiCPy PrepQM command, make sure GROMACS has been sourced, i.e. is available on the command line. In particular, you may need to set the environment variable GMXLIB with the following command, where the path to use the one where the GROMACS share/gromacs folder is located
export GMXLIB='/path-to-gromacs-installation/share/gromacs/'
The PrepQM command will open an interactive session with the following message printed out (more details on the interactive selection environment can be found in the MiMiCPy documentation):
 	                ***** MiMiCPy *****

 	 For more information type mimicpy [subcommand] --help

=====> Running prepqm <=====


**Reading topology**


Some atom types had no atom number information.
They were guessed as follows:

+---------------------+
| Atom Type | Element |
+---------------------+
|     c     |    C    |
+---------------------+
|     c3    |    C    |
+---------------------+
|     o     |    O    |
+---------------------+
|     hc    |    H    |
+---------------------+

**Reading coordinates**  |Done

Please enter selection below. For more information type 'help'
MiMiCPy requires the atomic element information for each atom to generate the CPMD input script. Some non-standard atom types in the GROMACS topology file do not contain this information (atom types c, c3, o, and hc). MiMiCPy guesses them based on the combination of atomic mass, name and type. Always verify that the guessed atomic elements for each atom type are meaningful, as it is essential for CPMD to run correctly.
 Handling non standard atomtypes with MiMiCPy
MiMiCPy guesses non-standard atom types based on the combination of atomic mass, name and type. The automatic behavior of guessing atomic elements can be toggled on or off using the -guess option. If False is passed and non-standard atoms are present, MiMiCPy will exit with an error message instead of attempting to guess the elements. If you are not satisfied with the element information guessed, a file containing the list of all non-standard atom types with the correct element information can be passed to mimicpy prepqm with the -nsa option. For example, if MiMiCPy guessed the wrong atomic number for atom type c3 and o, we could create a file called atomtypes.dat with the following text:
o O
c3 C
and pass it to MiMiCPy when running prepqm
mimicpy prepqm -top acetone_equilibrated.top -coords acetone_equilibrated.gro -nsa atomtypes.dat
At this point, the user can provide instructions to add and/or delete atoms to the QM region in an interactive session. The instructions specified after add correspond to the selection query that identifies the atoms to be added to the QM region. MiMiCPy provides a selection language similar to PyMOL and VMD for selecting QM atoms. In this example, we want to add the acetone molecule to the QM region, hence we’ll select the ACT residue with the following command:
> add resname is ACT
Selection query in MiMiCPy command
The syntax for the selection query involves the following general structure:
> keyword logical_operator value
where keyword can include resname, resid, name, type, id, and mol. logical_operator can be is, not, >, <, >=, or <=.
Different selection queries can be joined by using and or or operators, and grouped with brackets, such as
> add (resname is RES) and (name is x)
which will add atom named X of residue RES.
With the same selection syntax atoms can also be deleted from the QM region, using the delete command instead of add.
To check the current QM region, the view command can be used. When the desired QM atoms are selected, type q to exit.
More details on the interactive selection environment can be found in the MiMiCPy documentation.
We can check the current QM region to console using view
> view
which will produce the following output
   type  resid  is_bound resname name  charge element  mass  mol      x      y      z
id
1     c      1        0     ACT   C1  0.8102       C  12.0  ACT  1.212  1.264  1.201
2    c3      1        0     ACT   C2 -0.4767       C  12.0  ACT  1.222  1.135  1.280
3    c3      1        0     ACT   C3 -0.4767       C  12.0  ACT  1.326  1.362  1.210
4     o      1        0     ACT   O1 -0.5864       O  16.0  ACT  1.110  1.295  1.143
5    hc      1        0     ACT   H1  0.1216       H   1.0  ACT  1.197  1.046  1.223
6    hc      1        0     ACT   H2  0.1216       H   1.0  ACT  1.321  1.121  1.324
7    hc      1        0     ACT   H3  0.1216       H   1.0  ACT  1.154  1.135  1.365
8    hc      1        0     ACT   H4  0.1216       H   1.0  ACT  1.393  1.314  1.139
9    hc      1        0     ACT   H5  0.1216       H   1.0  ACT  1.299  1.457  1.164
10   hc      1        0     ACT   H6  0.1216       H   1.0  ACT  1.360  1.373  1.314
Now that we verified that all the atoms of the acetone molecule are correctly included in the QM region, you can terminate the interactive session using quit (or q)
> quit
which will terminate the interactive session and print the following output
Wrote Gromacs index file to index.ndx
Wrote new CPMD input script to cpmd.inp
MDP file not passed! Skipping generation of GROMACS TPR file

=====> Done <=====
As stated in the last output, MiMiCPy has generated a GROMACS index file, named index.ndx by default (a custom name can be set using the output option -ndx when running mimicpy prepqm) and a CPMD input script, named cpmd.inp by default (custom name with -out option).
The index.ndx file contains the GROMACS IDs of the QM atoms, in this case they are the first ten atoms in the topology:
; Generated by MiMiCPy
[ QMatoms ]
     1     2     3     4     5     6     7     8     9    10
The cpmd.inp file contains some basic sections necessary in a CPMD input in order to run QM/MM simulations with MiMiC. In particular, the section generated include &MIMIC, &CPMD, &SYSTEM, and &ATOMS.
To run a QM/MM simulation with MiMiC, a GROMACS binary .tpr file is also needed. This can be generated using GROMACS preprocessor (gmx grompp), using the index.ndx file generated by MiMiCPy. Copy the .mdp file provided and run GROMACS preprocessor.
cp ../../data/mimic.mdp .
gmx grompp -f mimic.mdp -c ../acetone_equilibrated.gro -p ../acetone_equilibrated.top -n index.ndx -o mimic.tpr
The above GROMACS command generated the mimic.tpr file, which can be used by MiMiC to perform QM/MM MD.
The two steps that we have just performed, i.e. generating an index (and CPMD input) file with MiMiCPy and using that to run the GROMACS preprocessor, can be conveniently combined in a single MiMiCPy command. This, together with other useful keywords, will be shown in the next section.
PrepQM keywords
As mentioned above, the MM topology and coordinate files are the minimal inputs for PrepQM. However, for practical uses the output files generated will not be enough to directly start a MiMiC QM/MM simulation. In this section, some useful keywords are explained. For each of them, if an input file is needed, it is provided as example in the data folder. Those will be copied later and used to run PrepQM a second time, generating the necessary input to start a MiMiC QM/MM MD simulation.
-sele: the list of selection commands (theadd resname is ACTselection used before in the interactive session) can be saved in a file and provided as input.-mdp: the GROMACS MD parameters file can be passed and MiMiCPy will automatically generate the GROMACS.tprfile using thegmx gromppcommand (avoiding the two-step process used before). The output name for the.tprfile can be specified using the additional input option-tpr, and the name of the executable for runninggromppcan be passed with the-gmxoptiongmx,gmx_mpi, orgmx_mpi_d).-pp: pseudopotential information written in the&ATOMSsection of the CPMD input is by default set toKLEINMAN-BYLANDERwithLMAX=S, and needs to be manually corrected. Otherwise, pseudopotential information can be written in a file and passed using the-ppoption. This file should contain information like the pseuodopotential filenames for a specific atom, the same for the boundary atom version and other labels like LMAX and LOC. The data for each element is given in separate lines, and each line has the following format:<element> <pp filename> <bound pp filename> <labels> <lmax> <loc>, where a-can be used to skip any of this information.-inp: by default,mimicpy prepqmoutputs a barebones CPMD script, where many sections need to be manually filled to be able to start a QM/MM simulation. Missing CPMD sections and commands can be saved in a template script, passed to PrepQM. These sections will be copied into the generated CPMD input.-pad: the size of the QM region is specified in the CPMD input with theCELLkeyword in the&SYSTEMsection. By default, MiMiCPy writes a cell size exactly bounding the QM atoms, which is often not enough to contain the plane waves of the QM region. For this reason, a padding needs to be added, i.e. an additional distance between the QM atoms and the walls of the QM box (specified in nm). A standard value for the Poisson solver is 3-3.5 Å , but in general the question of the right padding should be considered and chosen wisely depending on the system under study. MiMiCPy adds this on both sides in each direction; therefore, with a-padof 0.35, a value of 0.7 nm is actually added in each direction to the size of the QM system.-q: by default, MiMiCPy calculates the total charge of the QM region (specified with theCHARGEkeyword in the&SYSTEMsection of the CPMD input) using the MM charges of the QM atoms from the force field data. This is usually enough, but it may need to be cross checked. Alternatively, a charge value to be written in the output can be specified using the-qoption.-path: the path specified in thePATHSkeyword of the&MIMICsection refers to the path of the directory from which GROMACS will be run, i.e. where themimic.tprfile is located. By default, MiMiCPy uses the current directory. Alternatively, a path can be specified with the-pathoption.
The above keywords are the most useful ones when using MiMiCPy PrepQM in practice. Additional keywords are available, and can be found in the MiMiCPy PrepQM documentation.
Now that you are more familiar with the main PrepQM keywords, let’s run the mimicpy prepqm command to add them. The input files needed for this tutorial are provided.
cp ../../data/sele.dat .
cp ../../data/mimic.mdp .
cp ../../data/pp_info.dat .
cp ../../data/template.inp .
![]() When running MiMiCPy PrepQM command, make sure GROMACS has been sourced, i.e. is available on the command line. In particular, you may need to set the environment variable
When running MiMiCPy PrepQM command, make sure GROMACS has been sourced, i.e. is available on the command line. In particular, you may need to set the environment variable GMXLIB with the following command, where the path to use the one where the GROMACS share/gromacs folder is located
export GMXLIB='/path-to-gromacs-installation/share/gromacs/'
The next command shows you how you can easily generate the GROMACS index and .tpr files, together with a complete CPMD input for MiMiC, using MiMiCPy. In particular, this time MiMiCPy generates the cpmd_mimic.inp CPMD input file (whose name has been specified with the option -out), which is a full CPMD input file ready to be used for running MiMiC (the input provided is in particular to run a BO MD in the NVE ensemble). Compare this input file with the previously generated cpmd.inp.
mimicpy prepqm -top ../acetone_equilibrated.top -coords ../acetone_equilibrated.gro -sele sele.dat -inp template.inp -pp pp_info.dat -pad 0.35 -out cpmd_mimic.inp -mdp mimic.mdp -gmx gmx -tpr mimic.tpr
Boundary atoms
In the example the QM region was quite easy to select, in particular it was a single molecule (the acetone molecule) with no covalent bond with any other MM atom of the system. This is not always the case, especially when dealing with biological systems, where usually some of the amino acids are treated at QM level, while the rest of the protein is treated at MM level. The atoms at a boundary point between QM and MM regions, when a covalent bond is present between them, are referred to as boundary atoms. One approach to describe boundary atoms is to use the boundary-atom scheme, where open-valence QM atoms are described through a special optimized monovalent pseudopotential with the required valence change in place of a classical atom. In the CPMD input, ‘regular’ QM atoms and boundary atoms are in separate blocks of the &ATOMS section, since they are described by different pseudopotential.
The syntax for selecting boundary atoms in MiMiCPy PrepQM is similar to the one for other QM atoms, with the exception of the keyword used, which add-bound instead of just add, followed by the <selection>.
To give an example, we will partition our acetone molecule in a quite weird way, but this should give you a clear example of the different selection of ‘regular’ and boundary atoms. For clarity, we will just use the minimal input for PrepQM, i.e. a MM topology and a coordinate file.
mkdir boundaryatoms
cd boundaryatoms
mimicpy prepqm -top ../../acetone_equilibrated.top -coords ../../acetone_equilibrated.gro
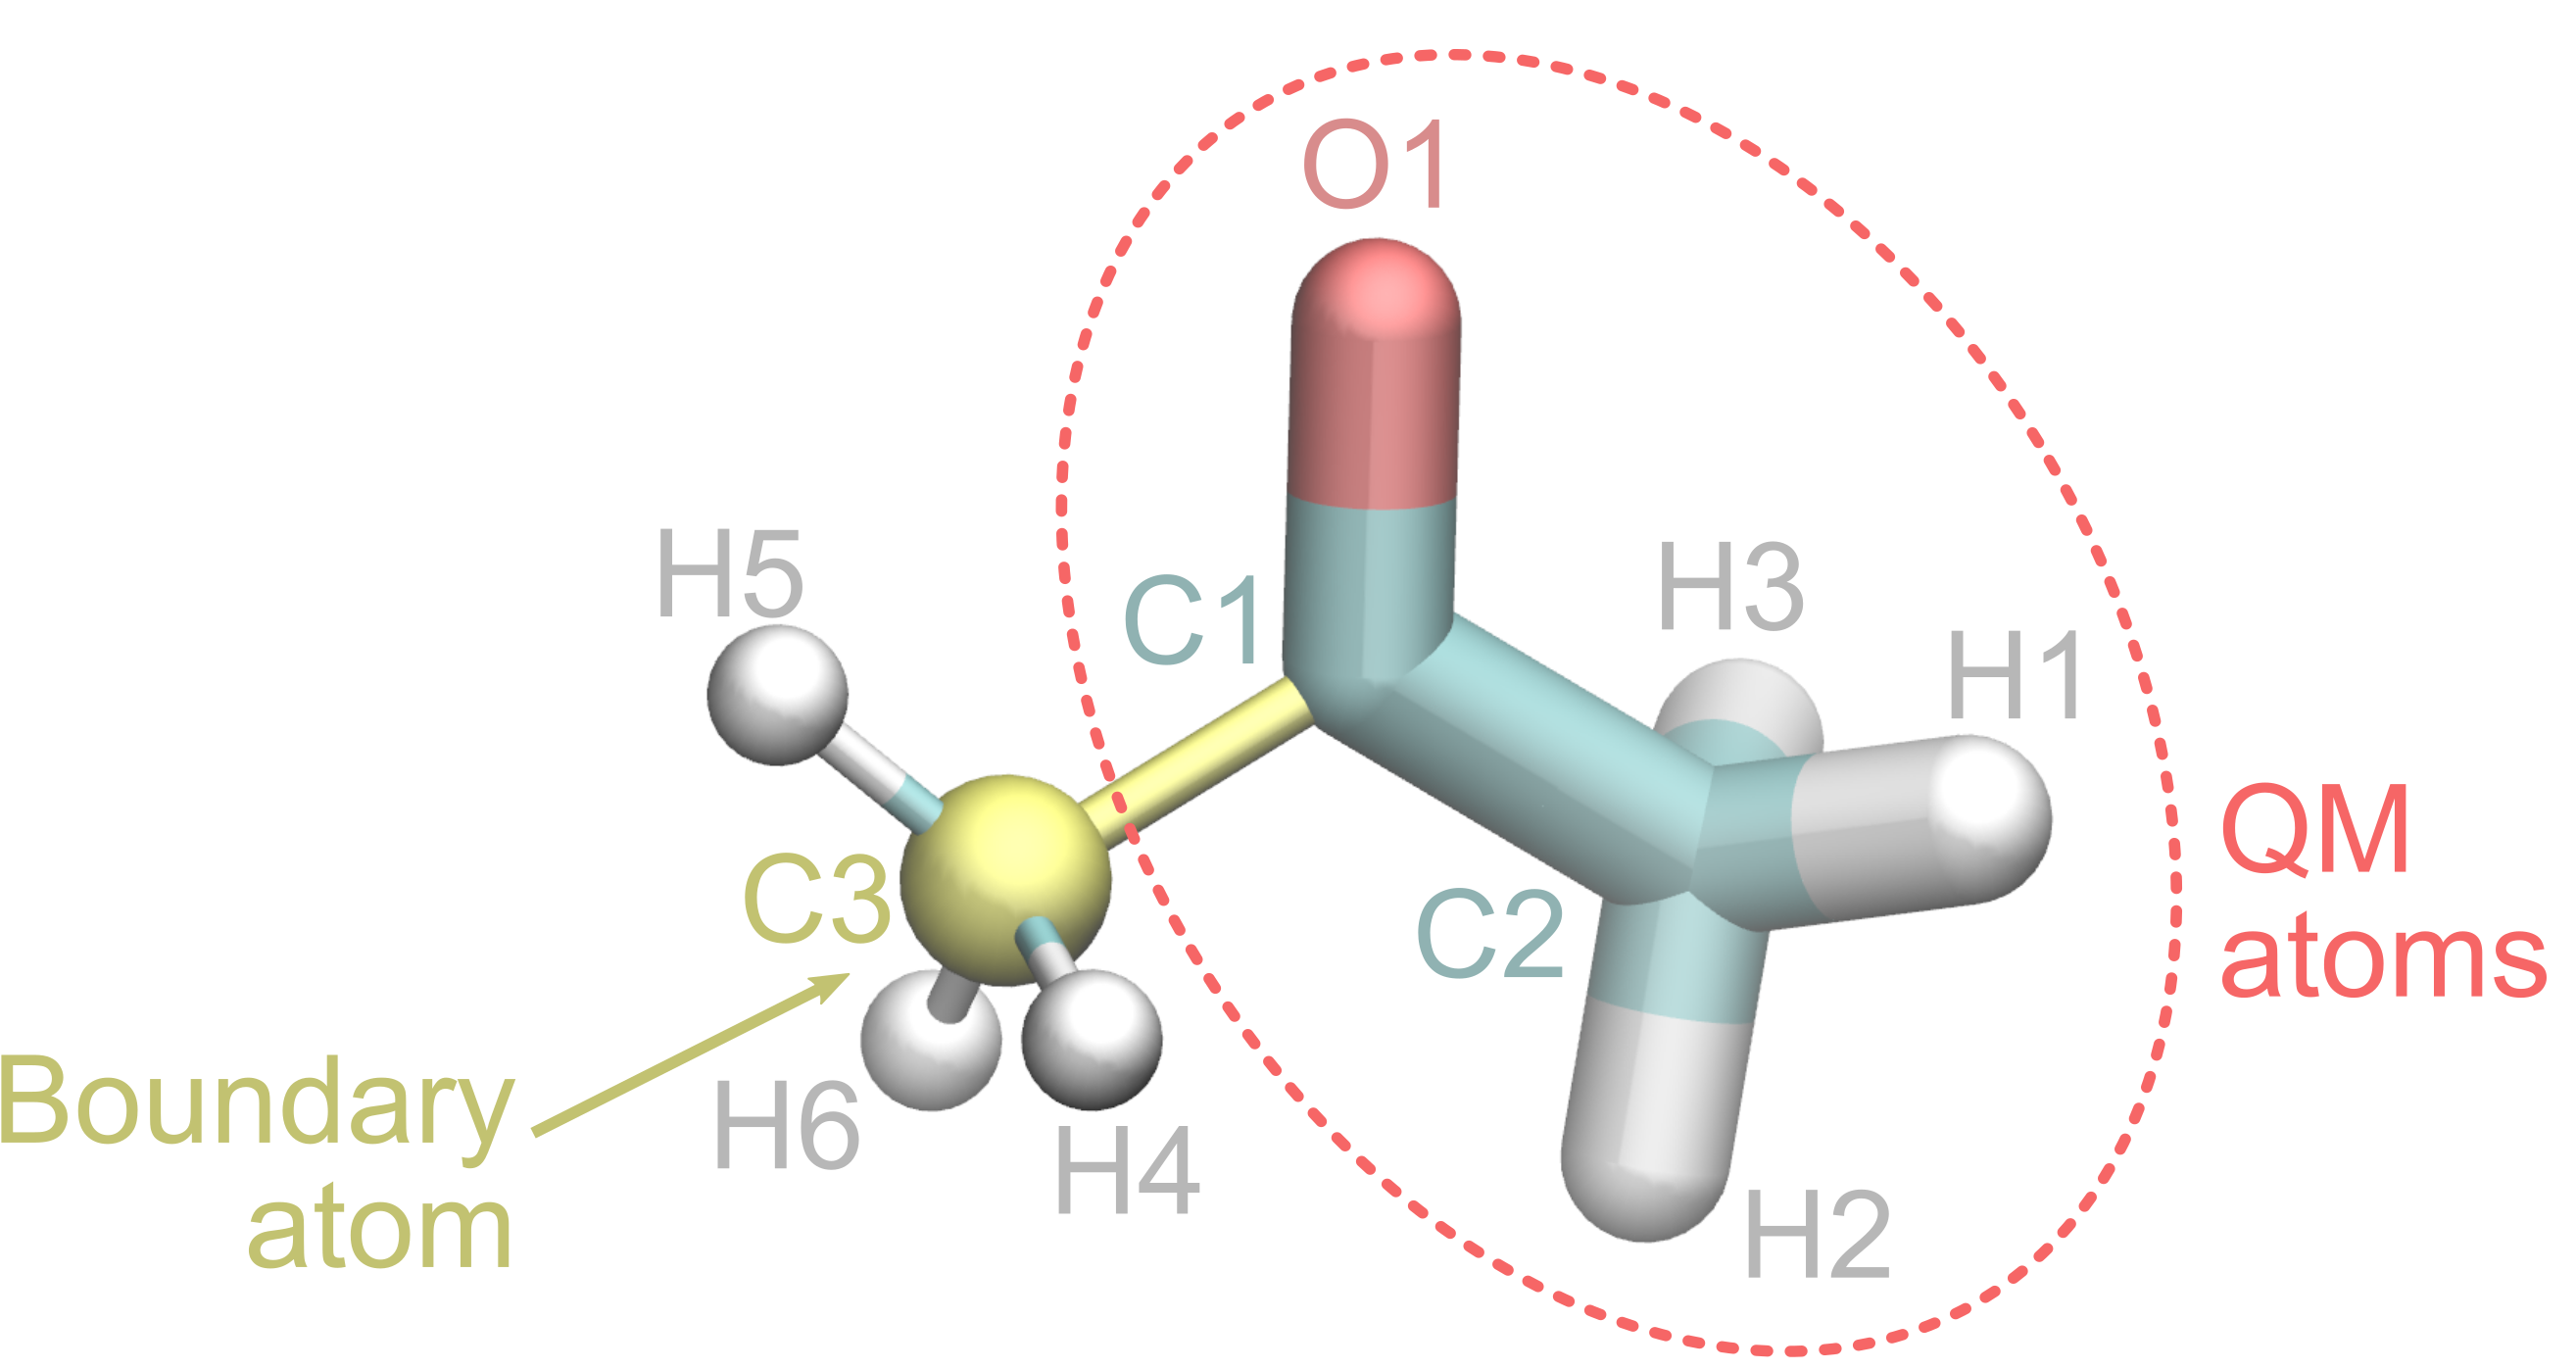
Let’s pretend we want to treat the oxygen atom and one of the two CH3 groups at QM level, and the other CH3, together with the water molecules, at MM level. The C-C bond will be the covalent linkage between the QM and MM region and the C3 carbon will be the boundary atom.
A possible way to make this selection in PrepQM is the following:
> add name is O1
> add name is C1
> add name is C2
> add name is H1
> add name is H2
> add name is H3
> add-bound name is C3
where the first six commands add the atoms to the QM region, and the last one selects C3 as boundary atom.
With this selection, C1 and C2 carbons in the &ATOMS section of the generated CPMD input file will appear as
*C_MT_BLYP.psp KLEINMAN-BYLANDER
while C3 as
*C_MT_BLYP_BOUNDARY.psp KLEINMAN-BYLANDER
i.e. they will be treated with different pseudopotentials.
![]() Be aware that the input generated in this illustrative example would cause you trouble if you try to use it for a QM/MM MD run. This is because with the splitting of the acetone molecule used to illustrate how to treat boundary atoms, the MM region contains some atoms from a non-standard residue, i.e. the atoms of acetone left outside the QM region. CPMD will not have the species information for these atoms, which can lead to segmentation fault errors. This can be solved using MiMiCPy FixTop command (illustrated in a separate section of this tutorial).
Be aware that the input generated in this illustrative example would cause you trouble if you try to use it for a QM/MM MD run. This is because with the splitting of the acetone molecule used to illustrate how to treat boundary atoms, the MM region contains some atoms from a non-standard residue, i.e. the atoms of acetone left outside the QM region. CPMD will not have the species information for these atoms, which can lead to segmentation fault errors. This can be solved using MiMiCPy FixTop command (illustrated in a separate section of this tutorial).
Boundary atom automatic guess
MiMiCPy can also automatically guess boundary atoms. This feature can be activated by setting the -bound option to True (False by default). With this option, MiMiCPy can automatically mark the QM atoms at the QM/MM interface as boundary atoms.
As before, let’s pretend to want to treat O1, C1, C2, H1, H2, and H3 at QM level, without manually specifying the boundary atoms this time (where we use the -ndx and -out options to save the index and CPMD input files avoiding to overwrite the previously generated ones for comparison):
mimicpy prepqm -top ../../acetone_equilibrated.top -coords ../../acetone_equilibrated.gro -bound True -ndx index_boundtrue.ndx -out cpmd_boundtrue.inp
Where the -bound option is set to True.
Performing the same selection as before for the atoms in the QM atoms, i.e.
> add name is O1
> add name is C1
> add name is C2
> add name is H1
> add name is H2
> add name is H3
now yields to this output:
Boundary atoms were automatically set. The following atoms were marked as boundary atoms:

+----------------+
| Atom | Residue |
+----------------+
| 1 C1 |  1 ACT  |
+----------------+
Wrote Gromacs index file to index_bound.ndx
Total charge of QM region is 0.11189999999999997, Rounding to integer
Wrote new CPMD input script to cpm_bound.inp
MDP file not passed! Skipping generation of GROMACS TPR file

=====> Done <=====
The C1 carbon has been automatically detected and set as boundary atom. MiMiCPy generated two files: index_boundtrue.ndx and cpmd_boundtrue.inp. You should see no difference with the index.ndx and cpmd.inp files generated in the Boundary atoms section.
VMD and PyMOL support
MiMiCPy also provides plugins for the molecular visualization packages VMD and PyMOL. These can be optionally activated during the MiMiCPy installation process.
The next two sections will perform the same operations, once with VMD and once with PyMOL.
![]() Make sure to have installed MiMiCPy enabling the VMD and/or PyMOL support during the installation procedure described in the Installation/MiMiCPy section.
Make sure to have installed MiMiCPy enabling the VMD and/or PyMOL support during the installation procedure described in the Installation/MiMiCPy section.
![]() MiMiCPy requires Python >= 3.5, pandas >= 0.24.0 and numpy >= 1.12.0. The plugins have been tested with PyMOL version 2.3.4 and VMD version 1.9.4a38, although other versions are expected to work. If any incompatibilities are found, please post an issue on GitLab.
MiMiCPy requires Python >= 3.5, pandas >= 0.24.0 and numpy >= 1.12.0. The plugins have been tested with PyMOL version 2.3.4 and VMD version 1.9.4a38, although other versions are expected to work. If any incompatibilities are found, please post an issue on GitLab.
VMD
Open the provided acetone_equilibrated.gro structure with VMD
vmd ../../acetone_equilibrated.gro
The prepqm command can be used in the TK console of VMD. For this, what is needed is a selection of QM atoms (and any boundary atom, if present) to pass to the prepqm plugin. In this case, if you performed the preceeding steps of this tutorial, the selection would be quite straightforward. However, a good practice is to create your selection as a graphical representation, visually inspect it to ensure everything is correctly selected, and proceed with the TkConsole.
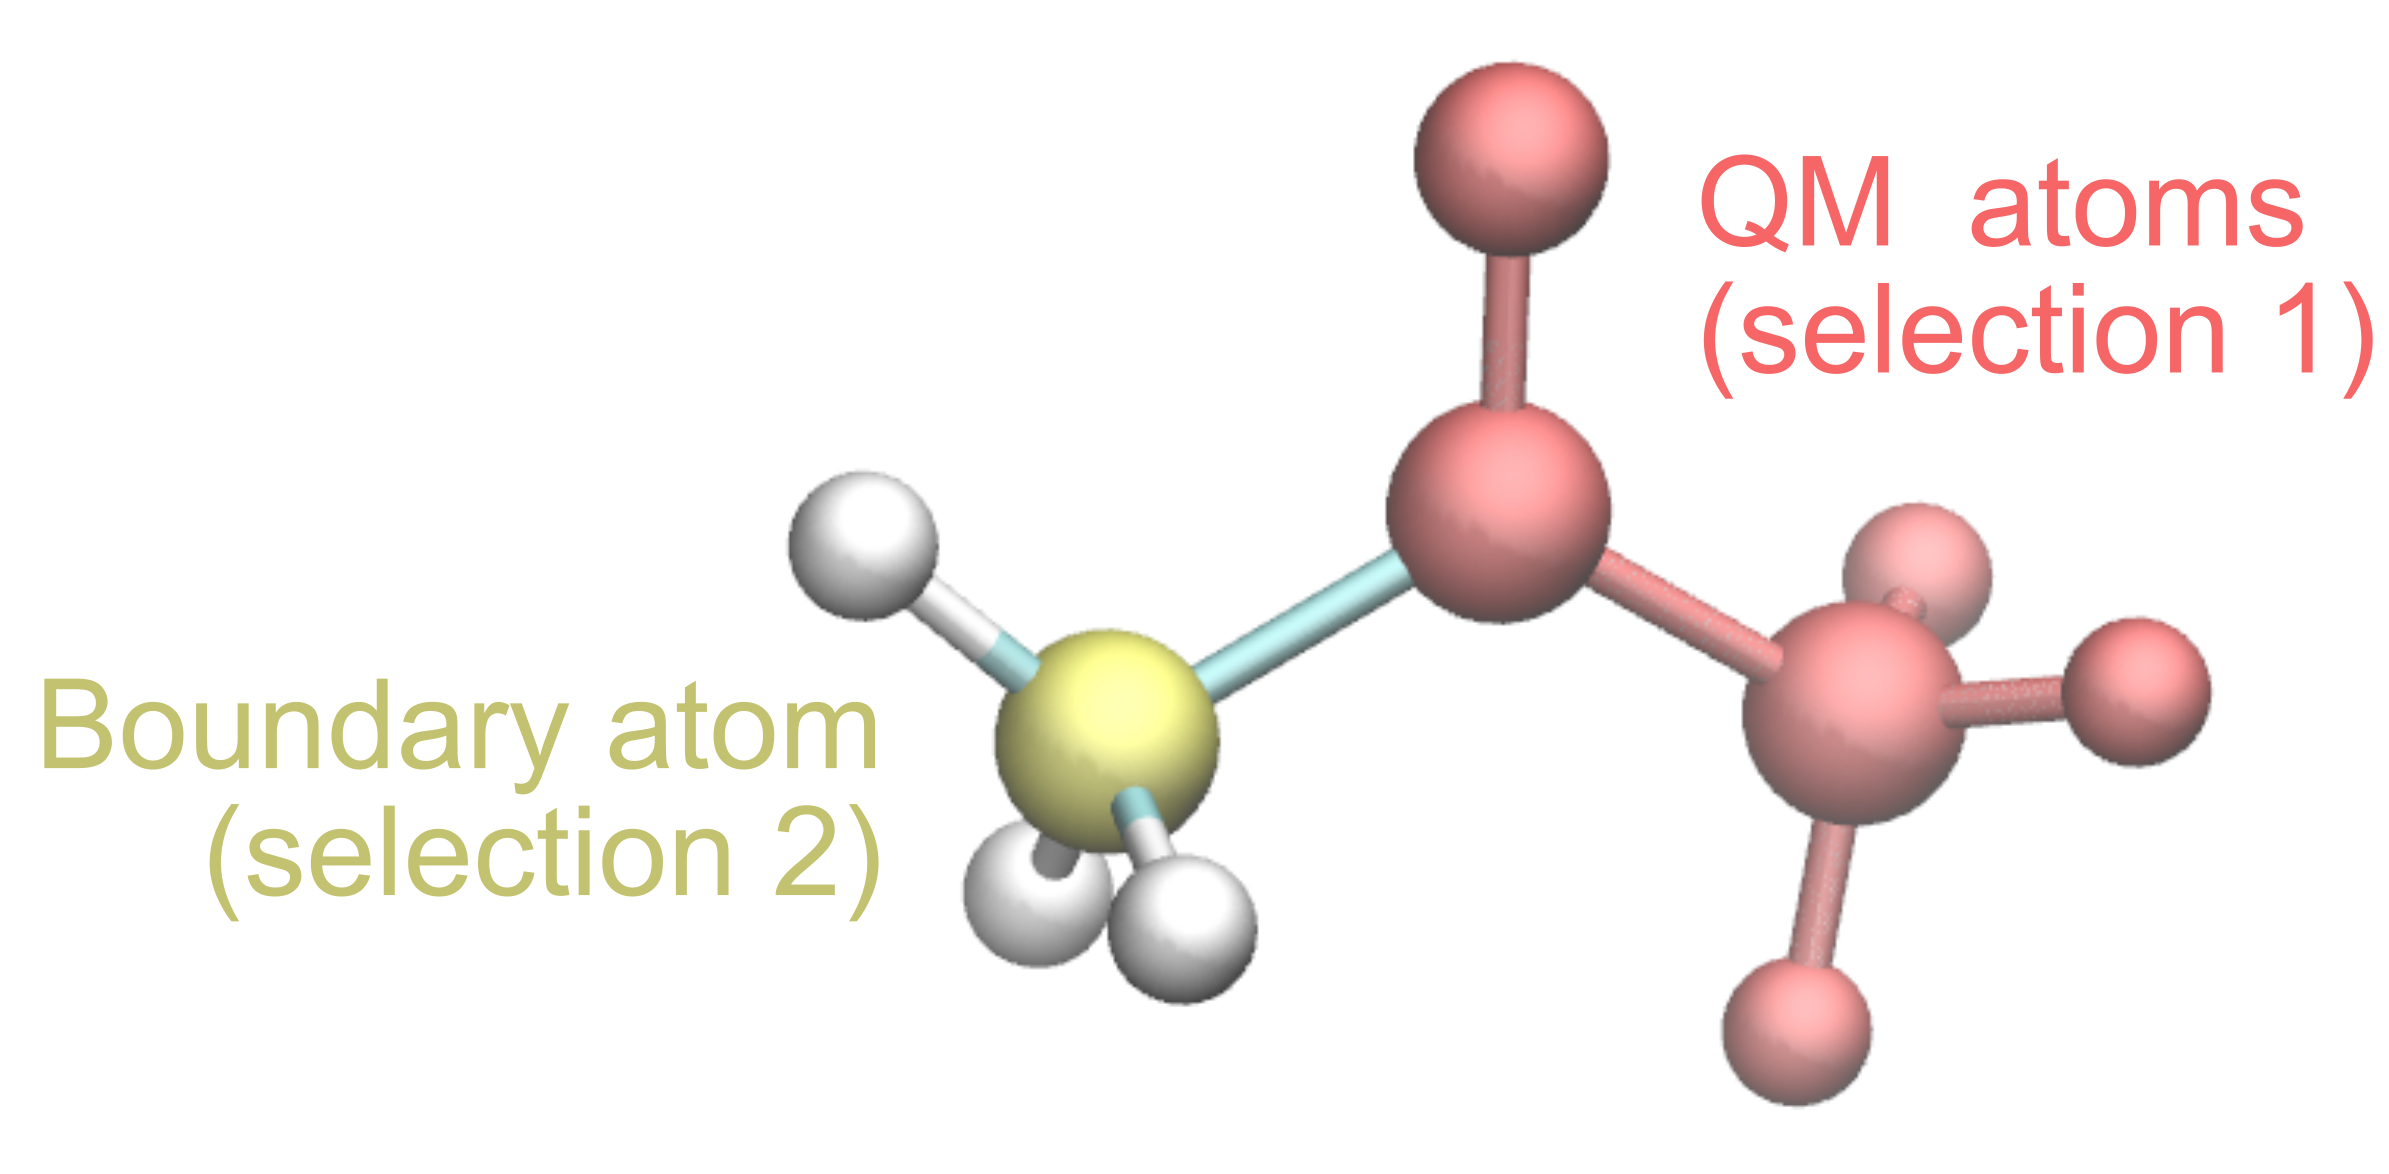
In order to be able to see the different selections for ‘regular’ QM atoms and boundary atoms, as done in the Boundary atoms section, we will pretend to want to treat the oxygen atom and one of the two CH3 groups at QM level, and the other CH3, together with the water molecules, at MM level. The C-C bond will be the covalent linkage between the QM and MM region and the C3 carbon will be the boundary atom.
Open the Graphical Representations window from the VMD Main by clicking Graphics > Representations.... You can create a new representation by clicking Create Rep. We want to include in this first representation the ‘regular’ QM atoms. You can do this by typing the following VMD selection as Selected Atoms
name O1 C1 C2 H1 H2 H3
An easy way to visually inspect if your selection corresponds to what you wanted is to change Drawing Method and/or Coloring Method. In this way you will immediately see the atoms that will be assigned to the QM region.
Add a second representation for the boundary atoms by clicking again Create Rep and now selecting
name C3
You can see below an example, where the atoms corresponding to the first selections are colored in red, while the boundary atom is colored in yellow.
Now that we know what atoms to select, it is possible to proceed with the prepqm plugin: open the TK Console by clicking Extensions > TK Console from the VMD Main window and type the following commands (which will define the selections for the QM atoms and the boundary atom):
set sel [atomselect top "name is O1 C1 C2 H1 H2 H3"]
set sel_bound [atomselect top "name is C3"]
where set command creates a selection, followed by the name of the selection (sel or sel_bound in this case) and between square brackets we used the atomselect method followed by the molecule_id (top in this case, since we have only a molecule which is also the top one) and the selection_text (with the same VMD syntax as the one used in the Graphical Representations window).
Once the selections are created, it is possible to call the prepqm plugin in the TK Console and pass the selections
prepqm -top ../../acetone_equilibrated.top -sele $sel -molid 0 -sele_bound $sel_bound -out cpmd_vmd.inp -ndx index_vmd.ndx
where -sele is the selection of the QM atoms, -molid is the molecule ID (you can see that from VMD menu), -sele_bound is the selection for the boundary atoms. The remaining commands are analogous the usual MiMicPy PrepQM command we have used. Details about the syntax of the PrepQM plugin in VMD can be found in the MiMiCPy documentation.
You will see in the TK Console a similar output to the one shown when running PrepQM from terminal
Some atom types had no atom number information.
They were guessed as follows:

+---------------------+
| Atom Type | Element |
+---------------------+
|     c     |    C    |
+---------------------+
|     c3    |    C    |
+---------------------+
|     o     |    O    |
+---------------------+
|     hc    |    H    |
+---------------------+
Wrote Gromacs index file to index_vmd.ndx
Total charge of QM region is -0.3648, Rounding to integer
Wrote new CPMD input script to cpmd_vmd.inp
You can now close VMD and you will find in your folder the two new files generated: index_vmd.ndx and cpms_vmd.inp. You should see no difference with the index.ndx and cpmd.inp files generated in the Boundary atoms section.
PyMOL
Open the provided acetone_equilibrated.gro structure with PyMOL
pymol ../../acetone_equilibrated.gro
The prepqm command can be used in the console of PyMOL. For this, what is needed is a selection of QM atoms (and any boundary atom, if present) to pass to the prepqm plugin. In this case, if you performed the preceding steps of this tutorial, the selection would be quite straightforward. However, a good practice is to create your selection as a graphical representation, visually inspect it to ensure everything is correctly selected, and proceed with the selection via console.
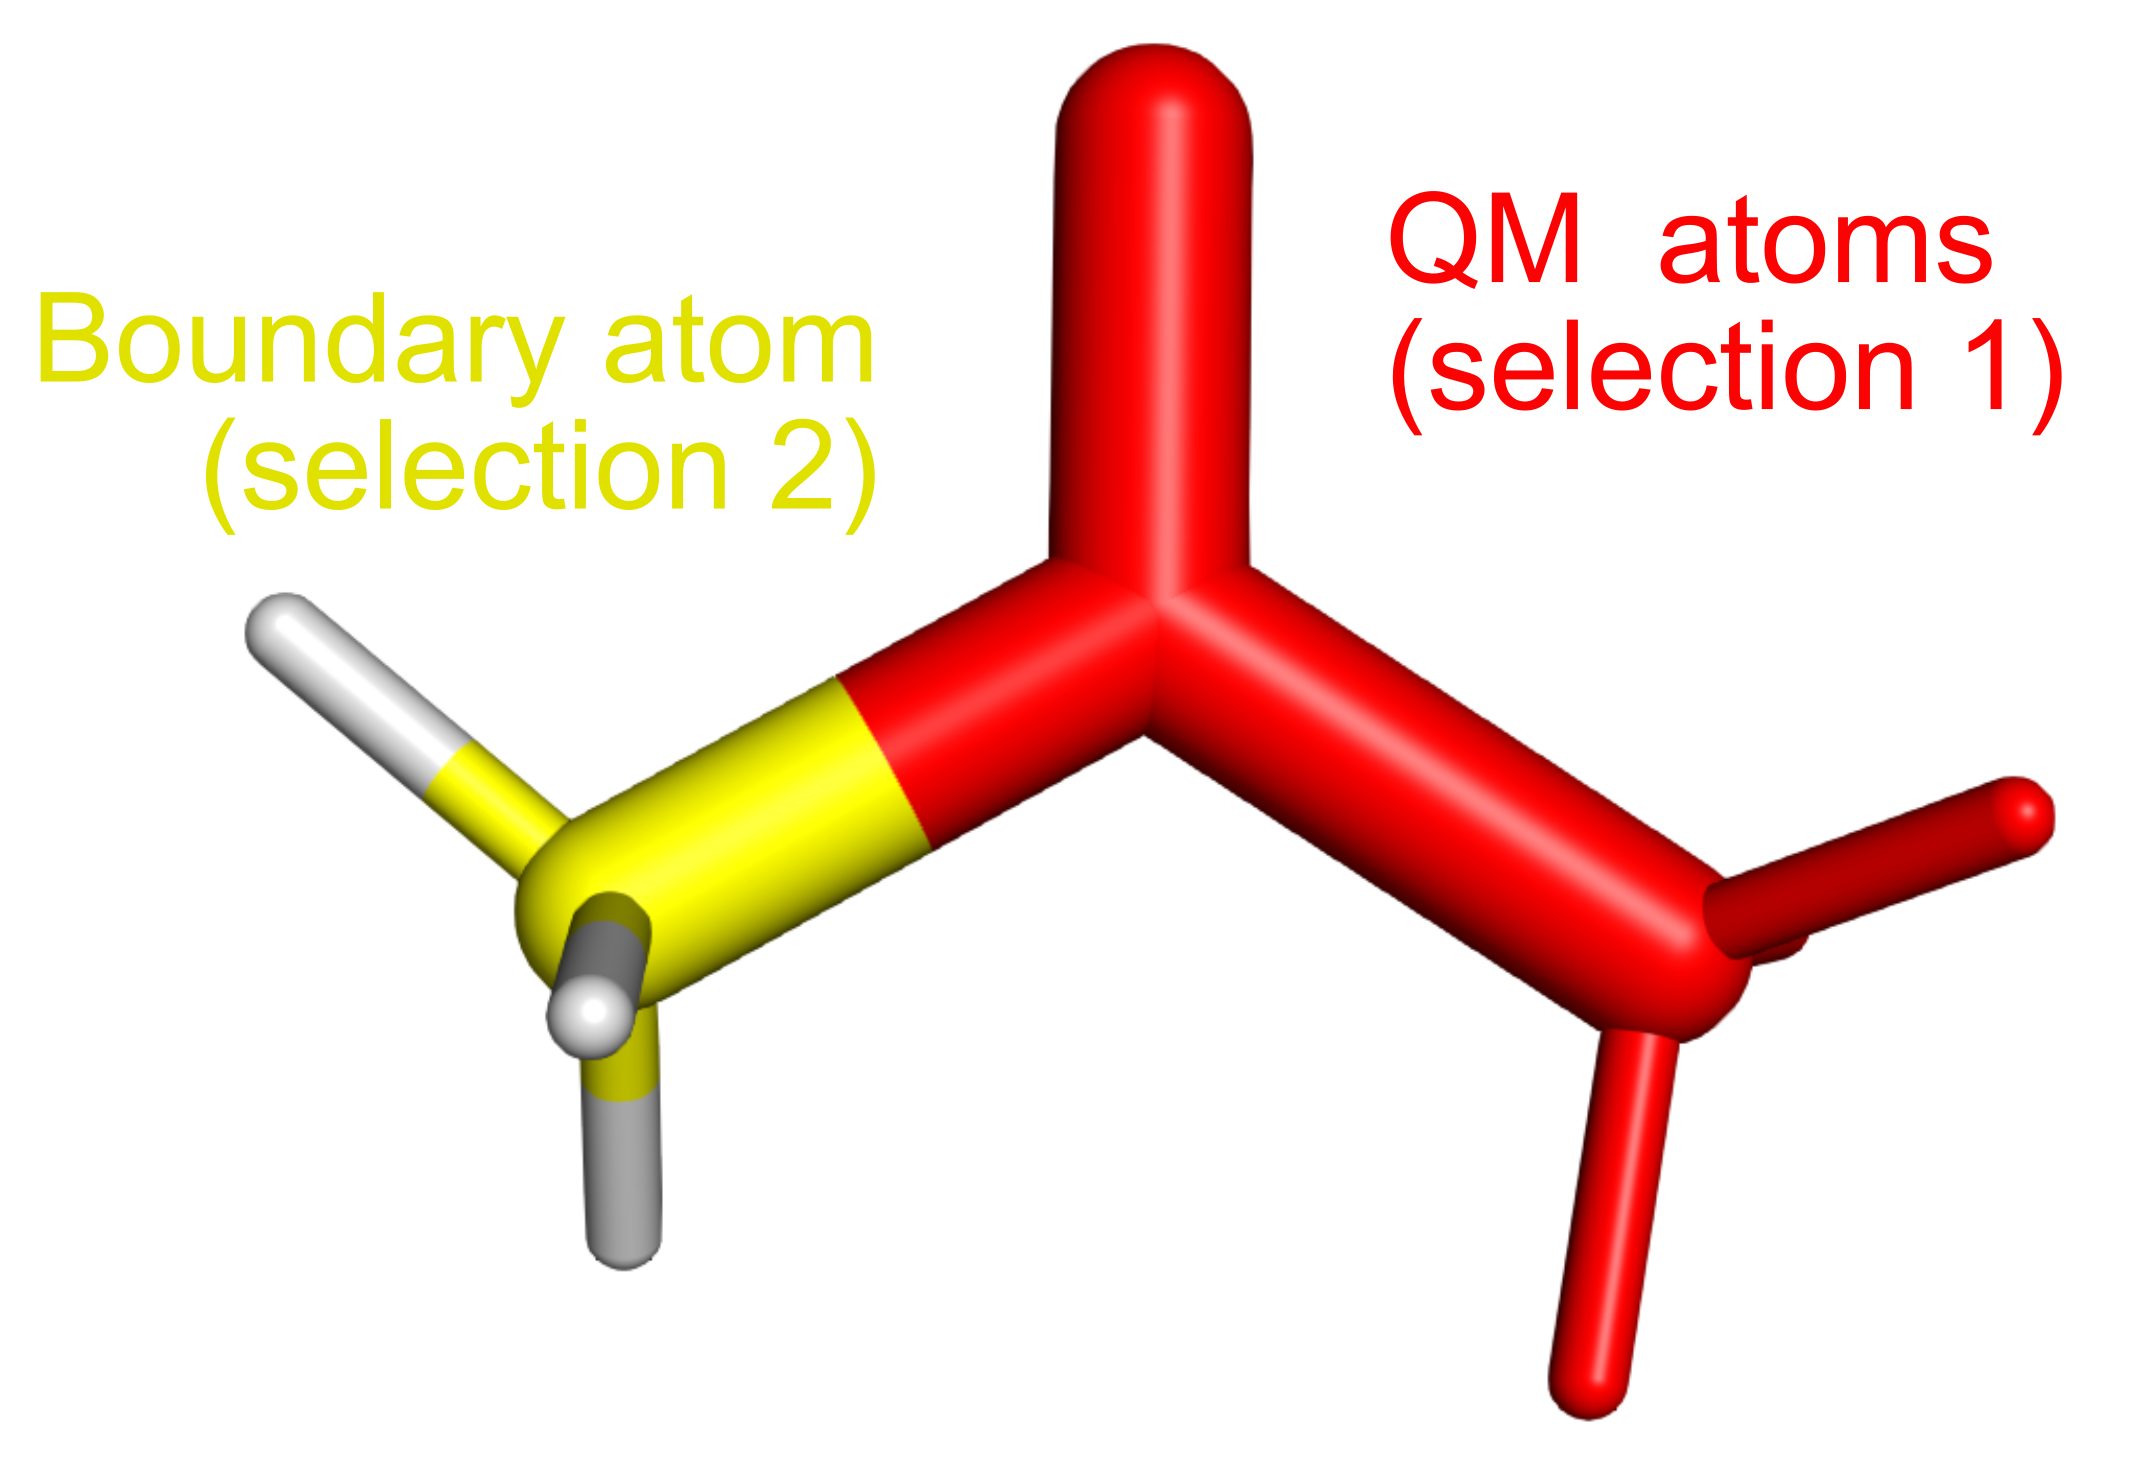
In order to be able to see the different selections for ‘regular’ QM atoms and boundary atoms, as done in the Boundary atoms section, we will pretend to want to treat the oxygen atom and one of the two CH3 groups at QM level, and the other CH3, together with the water molecules, at MM level. The C-C bond will be the covalent linkage between the QM and MM region and the C3 carbon will be the boundary atom.
You can create a new selection by typing it in the PyMOL command line. We want to include in this first representation the ‘regular’ QM atoms. You can do this by typing the following PyMOL selection
selection (name O1+C1+C2+H1+H2+H3)
set_name sele, qm_atoms
An easy way to visually inspect if your selection corresponds to what you wanted is to change how it is shown and/or colored (for example just by using color qm_atoms, red for the selection just created). In this way you will immediately see the atoms that will be assigned to the QM region.
Add a second selection for the boundary atoms as before, now selecting
selection (name C3)
set_name sele, boundary_atoms
You can see below an example, where the atoms corresponding to the first selections are colored in red, while the boundary atom is colored in yellow.
Now that we know what atoms to select, it is possible to proceed with the prepqm plugin: type in the PyMOL command line the following command:
prepqm ../../acetone_equilibrated.top, qm_atoms, boundary_atoms, out=cpmd_pymol.inp, ndx=index_pymol.ndx
where qm_atoms is the selection created for the QM atoms, bound_atoms is the one for the boundary atoms. The remaining commands are analogous the usual MiMicPy PrepQM command we have used. Details about the syntax of the PrepQM plugin in PyMOL can be found in the MiMiCPy documentation.
You will see in the PyMOL console a similar output to the one shown when running PrepQM from the command line
Some atom types had no atom number information.
They were guessed as follows:

+---------------------+
| Atom Type | Element |
+---------------------+
|     c     |    C    |
+---------------------+
|     c3    |    C    |
+---------------------+
|     o     |    O    |
+---------------------+
|     hc    |    H    |
+---------------------+
Wrote Gromacs index file to index_pymol.ndx
Total charge of QM region is -0.3648, Rounding to integer
Wrote new CPMD input script to cpmd_pymol.inp
You can now close PyMOL and you will find in your folder the two new files generated: index_vmd.ndx and cpmd_vmd.inp. You should see no difference with the index.ndx and cpmd.inp files generated in the Boundary atoms section.
FixTop
As mentioned at the end of the Boundary atoms section, not having species information for some of the atoms in the MM region will cause CPMD to crash because the atomic element for those atoms is not known by CPMD. This can happen when non-standard residues are included in the MM region and the corresponding topology files do not contain species information (which is usually the case since these are not needed by GROMACS, but by CPMD only) and is especially true if an MM atom, without species information, participates in a QM-MM bond. As the name suggests, FixTop command can be used to fix the topologies and is specifically designed for the aftermentioned cases.
Create a folder in the MiMiCPyTutorial/solution directory where you will test the FixTop command:
mkdir fixtop
cd fixtop
As in the Boundary atoms section, let’s pretend that in the system composed of an acetone molecule in water we want to treat the oxygen atom and one of the two CH3 groups at QM level, and the other CH3, together with the water molecules, at MM level. The C-C bond will be the covalent linkage between the QM and MM region and the C3 carbon will be the boundary atom.
In particular, no species information is given for the atoms of the acetone molecule that want to be treated at MM level (C3,H4,H5,H6) in the GROMACS topology. Let’s copy the acetone topology in the current folder to have a look
cp ../../data/acetone_equilibrated.top .
cp ../../data/acetone.itp .
In GROMACS, species information are specified in the [ atomtype ] section of a force field parameters.In this example, AMBER03 force field is used to treat MM atoms (as specified in the .top file by the amber03.ff/forcefield.itp). However, parameters for acetone are not included. This is why we need the additional acetone.itp file, as usual when dealing with non-standard residues in GROMACS. This file contains additional parameters, but not the atomic species, which is needed by CPMD. These parameters are stored in the ffnonbonded.itp file of the amber force field.
It is good practice to create a local copy of the force-field directory to avoid overwriting the original. Based on the location of your GROMACS installation, the absolute path will differ, but force fields are located in the following directory:
<path-to-gromacs>/share/gromacs/top/
and in particular, this directory contains the amber03.ff/ folder. For this tutorial you can copy this folder in the current directory or simply use the file provided in the data folder (we only include the ffnonbonded.itp file, which is sufficient for this tutorial).
cp ../../data/ffnonbonded.itp .
This is how this file looks like:
[ atomtypes ]
; name      at.num  mass     charge ptype  sigma      epsilon
H0           1       1.008   0.0000  A   2.47135e-01  6.56888e-02
Br          35      79.90    0.0000  A   3.95559e-01  1.33888e+00 ; Converted from parm99.dat
C            6      12.01    0.0000  A   3.39967e-01  3.59824e-01
⋮     	     ⋮        ⋮       ⋮      ⋮                 ⋮
Non-standard atomtypes are not contained in this file, and in particular this is the case for c3 and hc (the atom types for the carbon and hydrogen atoms we are interested in).
FixTop is able to guess the atomic species of all atoms where it is missing in the topology file (this includes those in MM region, which PrepQM will not fix), and prints a consolidated \texttt{[ atomtypes ]} section into a GROMACS \textsf{.itp} file.
Let’s fix this by running FixTop, here shown with a minimal input, i.e. only the topology
mimicpy fixtop -top acetone_equilibrated.top
This command will print the following message on the console, informing the users about which atom types have been guessed by FixTop and which element has been assigned to them. It’s always good to doublecheck that the guess performed by MiMiCPy is correct.
 	                ***** MiMiCPy *****

 	 For more information type mimicpy [subcommand] --help

=====> Running fixtop <=====


**Reading topology**


Some atom types had no atom number information.
They were guessed as follows:

+---------------------+
| Atom Type | Element |
+---------------------+
|     c     |    C    |
+---------------------+
|     c3    |    C    |
+---------------------+
|     o     |    O    |
+---------------------+
|     hc    |    H    |
+---------------------+

**Writing fixed [ atomtypes ] section**

Fixed and replaced [ atomtypes ] section in atomtypes.itp

=====> Done <=====
FixTop has generated a new file in your folder, atomtypes.itp. This will contain a [ atomtypes ] section for all the atoms in your topology, and in particular will have a new column with respect to the acetone.itp file that we have looked at before, at.num. This contains the atomic number for all the atomtypes, and is used by CPMD to understand what is the species of the MM atoms.
;     name    at.num   mass     charge  ptype      sigma     epsilon
         H0     1     1.0080     0.0000     A     2.471350e-01     6.568880e-02
         Br    35    79.9000     0.0000     A     3.955590e-01     1.338880e+00
          C     6    12.0100     0.0000     A     3.399670e-01     3.598240e-01
          ⋮     ⋮      ⋮          ⋮         ⋮      ⋮                 ⋮
         c3     6     0.0000     0.0000     A     3.399670e-01     4.577300e-01
         hc     1     0.0000     0.0000     A     2.649530e-01     6.568880e-02
          c     6     0.0000     0.0000     A     3.399670e-01     3.598240e-01
          o     8     0.0000     0.0000     A     2.959920e-01     8.786400e-01
In particular, FixTop copied the information from the force field specified in the topology and appended the missing ones for non-standard atom types at the end.
Additional options
The easiest way to incorporate these new parameters into an existing GROMACS force-field is to write it directly to the ffnonbonded.itp file, containing the [ atomtypes ] definition of the whole system for all default GROMACS force-fields. FixTop is able to replace the [ atomtypes ] section in the file passed as input for the -out option if in addition the -cls option is set to True. It will also clear all other [ atomtypes ] sections from the topology file.
Run the following commands (where we will make a copy of the original ffnonbonded.itp file to be able to compare the one generated by FixTop:
cp ffnononded.itp ffnonbonded_original.itp
mimicpy fixtop -top acetone_equilibrated.top -out ffnonbonded.itp -cls True
The ffnonbonded.itp file will be updated, and in particular will contain four new lines corresponding to the atom types of acetone.
In pactice you can create a local copy of the entire force field directory you are interested to use, update the topology including species information for all MM atoms and proceed using PrepQM with a complete topology for MM atoms.
CPMDid
Another very useful tool when working with MiMiC is cpmdid: it allows the user to print out the CPMD IDs of both QM and MM atoms, from a selection using the MM topology naming/numbering. This is especially helpful since MM IDs are reshuffled in a non-obvious way (grouping atoms according to species) when transferring data from GROMACS to CPMD. However, CPMD IDs for both QM and MM atoms need to be used in CPMD inputs, for example when applying constraints or adding multiple thermostats.
Create a folder in the MiMiCPyTutorial/solution directory where you will test the CPMDid command with different keywords:
mkdir cpmdid
cd cpmdid
Let’s suppose for example that we want to know the CPMD IDs for the acetone molecule and one of the surrounding water molecules (residue 32 in this case). The MM IDs can be easily obtained from the topology, or from visual inspection of the structure with, for example, VMD.
CPMDid needs as minimal input a topology file and a CPMD input file from which the OVERLAPS section is read. If you skipped the first section of this tutorial, where the PrepQM tool is illustrated, or if you want to start from scratch, you can quickly generate a CPMD input with the following command
cp ../../data/sele.dat .
mimicpy prepqm -top ../acetone_equilibrated.top -coords ../acetone_equilibrated.gro -sele sele.dat
where in this case we use a minimal input for PrepQM since we are only interested in correctly generating the OVERLAPS section, with the only addition of the sele option to avoid having to manually select the QM atoms from the interactive session.
![]() When running MiMiCPy PrepQM command, make sure GROMACS has been sourced, i.e. is available on the command line. In particular, you may need to set the environment variable
When running MiMiCPy PrepQM command, make sure GROMACS has been sourced, i.e. is available on the command line. In particular, you may need to set the environment variable GMXLIB with the following command, where the path to use the one where the GROMACS share/gromacs folder is located
export GMXLIB='/path-to-gromacs-installation/share/gromacs/'
CPMDid can be now run using the following command:
mimicpy cpmdid -top ../acetone_equilibrated.top -inp ../cpmdid/cpmd.inp
The CPMDid command will open an interactive session with the following message printed out:
 	                ***** MiMiCPy *****

 	 For more information type mimicpy [subcommand] --help

=====> Running cpmdid <=====


**Reading topology**


Some atom types had no atom number information.
They were guessed as follows:

+---------------------+
| Atom Type | Element |
+---------------------+
|     c     |    C    |
+---------------------+
|     c3    |    C    |
+---------------------+
|     o     |    O    |
+---------------------+
|     hc    |    H    |
+---------------------+

Please enter selection below. Type q or quit to exit.
We can select the acetone molecule and the nearby water molecule (with residue ID 32 in this example) with the following commands (the selection syntax is the same as PrepQM tool. More details on the interactive selection environment can be found in the MiMiCPy documentation):
> resname is ACT
> resid is 32
> q
This seleciton will generate the following message, and MiMiCPy will be terminated
The CPMD IDs for the selected atoms are:

+-----------------------------+
|   Atom  | Residue | CPMD ID |
+-----------------------------+
|   1 C1  |  1 ACT  |    1    |
+-----------------------------+
|   2 C2  |  1 ACT  |    2    |
+-----------------------------+
|   3 C3  |  1 ACT  |    3    |
+-----------------------------+
|   4 O1  |  1 ACT  |    10   |
+-----------------------------+
|   5 H1  |  1 ACT  |    4    |
+-----------------------------+
|   6 H2  |  1 ACT  |    5    |
+-----------------------------+
|   7 H3  |  1 ACT  |    6    |
+-----------------------------+
|   8 H4  |  1 ACT  |    7    |
+-----------------------------+
|   9 H5  |  1 ACT  |    8    |
+-----------------------------+
|  10 H6  |  1 ACT  |    9    |
+-----------------------------+
|  101 OW |  32 SOL |    41   |
+-----------------------------+
| 102 HW1 |  32 SOL |   577   |
+-----------------------------+
| 103 HW2 |  32 SOL |   578   |
+-----------------------------+

=====> Done <=====
As it is possible to see from the table in the output, the CPMD IDs for the acetone molecule are the first 10 CPMD IDs (the QM atoms are always placed at the beginning from CPMD) and the IDs for the water molecule change from 101, 102 and 103 in the MM topology to non-subsequent indices: 41, 577 and 578, respectively.
Output formats
In the previous example the CPMD IDs were only shown on the terminal and not saved. Moreover, the table format may not be always straightforward to convert into a CPMD input files, especially when you are dealing with a large number of atoms.
The CPMD IDs can be saved into an output file by adding the optional keyword -out, followed by the output file name.
Different output formats (for the result shown on the terminal or saved in the outpt file) can be specified by the additional keyword -print, each of them useful in different cases:
table: a table withAtom,ResidueandCPMD IDcolumns, reporting respectively MM atom name and number, MM residue name and number, and CPMD ID. This is the default option and is the same format as the one printed to the terminal before.list: a list of the CPMD IDs preceded by a line reporting ‘No. of atoms:’ and their number. This format is for example useful when constraints want to be specified using theFIX ATOMSkeyword, which needs to be followed by the number of atoms to be fixed and a list of their IDs.range: CPMD IDs grouped in ranges of subsequent atoms, with one group of consecutive atoms per line. The IDs of atoms with no other closeby IDs simply correspond to a line with a single number (the atom ID). This format is for example useful when multiple thermostats are used: the keywordNOSE IONS LOCALcollects groups of atoms to separate thermostats and ranges of IDs need to be specified for each of them.
To test these options, try to run the following commands (where the -out keyword is used in combination with different -print options), always selecting resname is ACT and resid is 32 as done previously.
mimicpy cpmdid -top ../acetone_equilibrated.top -inp ../prepqm/cpmd.inp -print table -out cpmdids_table.txt
In this case you should see in the output file the same table printed on the terminal in the previous example.
mimicpy cpmdid -top ../acetone_equilibrated.top -inp ../prepqm/cpmd.inp -print list -out cpmdids_list.txt
In this case, the output should be the following:
No. of atoms: 13

1     2     3     10    4
5     6     7     8     9
41    577   578
mimicpy cpmdid -top ../acetone_equilibrated.top -inp ../prepqm/cpmd.inp -print range -out cpmdids_range.txt
In this case, the output should be the following:
1 to 10
41
577 to 578
Compare the three files generated to verify they provide the same information. Based on a different context, one format or the other may be more useful.
To conclude, one additional useful keyword for MiMiCPy CPMDid, with the same usage as the PrepQM tool, is -sele: it allows to store in a file the selection command in text format and provides it as input, to avoid manually typing it in the interactive session.
Debugging with CPMD2Coords and Geom2Coords
There are two additional commands that are expecially useful while debugging a CPMD input file for MiMiC: CPMD2Corrds and Geom2Coords. CPMD2Corrds allows to convert the atom coordinates in a MiMiC CPMD input file to a GRO or a PDB file. This can assist in debugging the QM region in a MiMiC run, and confirm the correct atoms were placed in the QM region. Geom2Coords allows to convert a CPMD GEOMETRY or GEOMETRY.xyz file to a GRO or PDB file for easy visualization.
Create a folder in the MiMiCPyTutorial/solution directory where you will test the CPMD2Coords and Geom2Coords commands:
mkdir debug
cd debug
CPMD2Coords
After selecting the QM region using PrepQM, it is often good practice to check by visual inspection that all the correct QM atoms have been included. Any mistakes can lead to large issues when running MiMiC. But, it is difficult to extract the coordinates from the given CPMD input and visualize them. Here we can use the CPMD2Coords tool.
A CPMD input file is needed to test. If you skipped the first section of this tutorial, where the PrepQM tool is illustrated, or if you want to start from scratch, you can quickly generate a CPMD input with the following command
cp ../../data/sele.dat .
mimicpy prepqm -top ../acetone_equilibrated.top -coords ../acetone_equilibrated.gro -sele sele.dat
Now we can test the use of CPMD2Coords, by running:
mimicpy cpmd2coords -top ../acetone_equilibrated.top -inp cpmd.inp -coords qm.gro
This will result in the atoms and coordinates in the QM region of cpmd.inp being written to qm.gro in GROMACS format.
Coordinates from cpmd.inp, Generated by MiMiCPy
10
    1ACT     C1    1   1.212   1.264   1.201
    1ACT     C2    2   1.222   1.135   1.280
    1ACT     C3    3   1.326   1.362   1.210
    1ACT     O1    4   1.110   1.295   1.143
    1ACT     H1    5   1.197   1.046   1.223
    1ACT     H2    6   1.321   1.121   1.324
    1ACT     H3    7   1.154   1.135   1.365
    1ACT     H4    8   1.393   1.314   1.139
    1ACT     H5    9   1.299   1.457   1.164
    1ACT     H6   10   1.360   1.373   1.314
   0.28300   0.41100   0.22600
This can be easily visualized using for example VMD, or any other visualization software, and helps to confirm that the QM region selection is correct.
Geom2Coords
Another such tool is Geom2Coords. MiMiC runs output the trajectory and a GEOMETRY file from CPMD and as a TRR file from GROMACS. Usually these files will contain the same information, so it is prudent to only deal with the easier to handle TRR file. However, in times of unexpected errors, the information may not match or the TRR file may not be written correctly. In these cases it is imperative to be able to visualize the GEOMETRY file. We can do this with the Geom2Coords tool.
If you have already successfully run a MiMiC QM/MM run of the acetone system, you will have a GEOMETRY file which you can move to the debug directory we created. If you want to start from scratch, we provide the required file to test in the data folder
cp ../../data/GEOMETRY_example ./GEOMETRY
Then run:
mimicpy geom2coords -geom GEOMETRY -top ../acetone_equilibrated.top -inp cpmd.inp -out GEOMETRY.gro -guess True
This will result in GEOMETRY.gro, which can be visualized easily for example using VMD, or any other visualization software. Information such as atom number, residue name, and residue number are associated to each atom (as in a standard GROMACS coordinate file), and this helps the visualization, since the initial GEOMETRY file only had coordinates and velocities.
As a Python Library
The features of MiMiCPy can be accessed directly from Python code. This approach is particularly powerful when developing automated workflows. This final section of the handbook is intented as an introduction to the use of MiMiCPy as a Python library, and expecially during the QM region selection not all the commands will end up in a reasonable choice of the atoms. However, they should help to illustrate some basic commands to work with MiMiCPy as a Python library and show its capabilities.
![]() In order to follow this section, some familiarity with MiMiCPy is expected and in particular all the details of the selection syntax or CPMD input are not explained in detail again. For this reason, we suggest to at least go through the PrepQM section of this handbook before proceeding.
In order to follow this section, some familiarity with MiMiCPy is expected and in particular all the details of the selection syntax or CPMD input are not explained in detail again. For this reason, we suggest to at least go through the PrepQM section of this handbook before proceeding.
Create a folder in the MiMiCPyTutorial/solution directory where you will test the usage of MiMiCPy as a python library:
mkdir python-library
cd python-library
First import the library:
import mimicpy
The Preparation class is central to the code architecture. It can be initialized as follows:
prep = mimicpy.Preparation(selector)
The selector variable is an instance of a Selector class. This collates the input topology and coordinates, and handles the selection keywords from the user. Currently, there are three types of selector classes implemented:
selector = mimicpy.DefaultSelector(mpt, coords)
selector = mimicpy.VMDSelector(mpt)
selector = mimicpy.PyMOLSelector(mpt)
We use DefaultSelector to take advantage of the selection language provided by MiMiCPy. Notice that the selector accepts two arguments, an Mpt instance and a CoordsIO instance (the CoordsIO instance can be optionally passed to VMDSelector and PyMOLSelector. If not, it is assumed to be already loaded in the VMD/PyMOL environment). The Mpt or MiMiCPy Topology class is the class that handles parsing of all MM topologies supported by MiMiC. For example, to read a GROMACS topology file of acetone:
mpt = mimicpy.Mpt.from_file('../acetone_equilibrated.top')
![]() Make sure GROMACS has been sourced, i.e. is available on the command line.
Make sure GROMACS has been sourced, i.e. is available on the command line.
The Mpt class exposes the internal information of the topology. For example, to access the residue ID of the atoms with index 5:
mpt[5]['resid']
To access the residue IDs of all atoms as a list, we write:
mpt.resid
A similar syntax exists for properties like name, type, resname and mol.
Similarly, the CoordsIO class handles parsing of all MM coordinate files supported by MiMiC. This includes .gro and .pdb files.
coordsio = mimicpy.CoordsIO('../acetone_equilibrated.gro')
The coordinates and box size can be accesses by:
coordsio.coords
coordsio.box
When setting the selector variable, the topology information can be passed giving the Mpt class as input or directly passing the path to the topology file. The CoordsIO class is loaded internally and the path to the coordinates file needs to be passed.
In summation, to create a Preparation instance, you can use one of the two following commands:
mpt = mimicpy.Mpt.from_file('../acetone_equilibrated.top')
prep = mimicpy.Preparation(mimicpy.DefaultSelector(mpt, '../acetone_equilibrated.gro'))
or, equivalently:
prep = mimicpy.Preparation(mimicpy.DefaultSelector('../acetone_equilibrated.top', '../acetone_equilibrated.gro'))
We can now add QM atoms, and prepare our input files using the prep object.
prep.add('name is O1 or name is C1 or name is C2')
prep.add('name is H1 or name is H2 or name is H3')
We can also delete atoms, to get the same result:
prep.add('resname is ACT')
prep.delete('name is C1 or name is C3')
prep.delete('name is H4 or name is H5 or name is H6')
We can also add boundary atoms, either manually:
prep.add('name is C1', is_bound=True)
or by automatic detection:
prep.find_bound_atoms()
Both methods should result in the same CPMD input file. To generate the CPMD input and the GROMACS index file:
ndx, cpmd = prep.get_mimic_input()
A number of optional arguments can be passed to get_mimic_input(), allowing for many of the same functionalities of PrepQM:
get_mimic_input(inp_tmp=None, ndx_out=None, inp_out=None, box_padding=0.0, cell_as_absolute=False, ndx_group_name='QMatoms', path=None, charge=None, pp_info=None)
Where
inp_tmp: template cpmd input filendx_out: name of gromacs index fileinp_out: name of the mimic cpmd input filebox_padding: extra distance between qm atoms and wall in nmcell_as_absolute: return qm cell info as absolute instead of relativendx_group_name: name of qmatoms group in the index filepath: path in the mimic section, overrides templatecharge: charge of the qm region, overrides default algorithmpp_info: pseudopotential information as a pandas DataFrame or whitespace separated file
This function returns an instance of the Ndx and CPMD class. These handle the parsing and data access to resulting CPMD and index files. We can view the contents by printing them to console:
print(cpmd)
print(ndx)
These instances make it easier to edit the input scripts. Suppose we want to add a new &DFT section to cpmd:
cpmd.DFT = mimicpy.scripts.cpmd.Section()
This will create a new empty section called &DFT. We can now add parameters to this:
cpmd.DFT.FUNCTIONAL___BLYP = True
This will write the parameter FUNCTIONAL BLYP (___ designates a space) to the DFT section. If you want to remove this parameter:
cpmd.DFT.FUNCTIONAL___BLYP = False
Parameters with values can also be set. For example, to set the trajectory sample rate in the &CPMD section:
cpmd.CPMD.TRAJECTORY___SAMPLE = 500
If ndx_out and inp_out are passed to get_mimic_input(), the CPMD input script and the index file are written to files. We can also manually write them by running:
with open('cpmd.inp', 'w') ad f:
	f.write(str(cpmd))